Thursday, October 17, 2013

Last Minute Costumes 2008

So it's pretty much 5 years to the day that I was driving down the street with my 4.5 year old in the back seat. He was going on and on about how excited he was that he was going to be Captain Rex for Halloween. He just couldn't wait. Then he said "Momma, what is Sprinkles going to be?" 

I was 9 months pregnant with my second child. My oldest had named him "Sprinkles" when we discovered we were having another boy.

It was about mid-October and I was scheduled to have Sprinkles on October 22. That would mean he'd only be a measly 9 days old on Halloween. Honestly, I hadn't really considered taking him out for trick-or-treating. But I decided to humor my 4 year old and said "Oh, I don't know, maybe a bumblebee?"

"Noooo!" he responded.

"How about a pea-in-a-pod?" I suggested.

"Noooo!" he said again.

"Well, I don't know, Sweetie, he's only going to be a week old. Costume options are kind of limited."

"I know what he can be," he announced from the backseat. "Baby Stinky!!"

"Baby Stinky" aka Rotta the Huttlet was Jabba the Hutt's son. The Clone Wars movie had just come out that summer, and my oldest became a huge fan of all-things-Clone Wars, including "Baby Stinky".

I guess the "creative" gene runs strong in my family, because my little boy had come up with a FABULOUS idea! Baby Stinky is just a little slug. What better to dress a new-born infant as. All I had to do was make him a little "snuggie" that looked like a baby Hutt. Sure I could do that!

Sprinkles was born on October 22nd, as scheduled. 4 days in the hospital and we were back home as a new Family-of-4 on the 26th of the month…5 days before Halloween.

Being as we were preparing for a new baby, and I was HUGELY pregnant, I hadn't spent any time working on the Baby Hutt costume prior to giving birth. So there we were, a few days before Halloween and we weren't in the house 6 hours when my oldest asked "Momma, when are you going to make Sprinkles costume?"

4 days after having an 8lb 15oz baby via C-section, and my 4 year old is asking me to MAKE something. Really? But I had pretty-much promised him that Sprinkles would be Baby Stinky, and I really didn't want to let him down.

I took a few days to recuperate and settle in with a new new-born and then we headed out to the fabric store and picked up some tan fleece. It was 7 days post-delivery, and I was on the floor of my living room, laying my 1 week old son on the floor and drawing a "slug shape" around him.

Luckily it was really a simple thing to do. Basically it was a simplified "papoose" with eyes and little "muppet" hands.
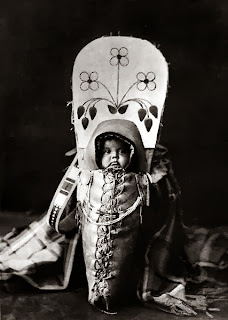

Papoose picture borrowed from Wikipedia: http://en.wikipedia.org/wiki/File:Edward_S._Curtis_Collection_People_007.jpg

I stuffed the arms with some stuffing material I had around the house. And the eyes I made from a pair of knee highs that I had in my dresser. I put a bit of stuffing in those, made them into little balls, and then painted them with some craft paint to look like Baby Stinky's eyes.

I made all the wrinkles by just pinching the fabric and hot gluing it together (I love hot glue!).


Finished Baby Stinky aka Rotta infant costume. Made from fleece and nylon stockings.

And there you have it, "Sprinkles" first Halloween costume—Baby Stinky! I can't wait to put this one up in a slide show on his wedding day.


Sprinkles first Halloween costume - 9 days old

And just in case you've never seen "Baby Stinky" before, here is what he looks like from the movie:


Baby Stinky aka Rotta The Huttlet

=========================================

Oh, of course my oldest couldn't be happy with just his baby brother having a costume. He wanted Momma to have one too. And who did he want ME to be? Ahsoka Tano! Yes, he wanted me, a 37 year old woman who had just given birth to a nearly 9 pound baby to dress up as a young teen alien who wears a tube top and a skirt.

The things I do for my kids, I tell you!

I pulled this one together ON Halloween, and thought I proud of my last-minute creativity to make it happen, I'm not going to say that I was that "pretty" of an Ahsoka. But you know what, my son LOVED it. He thought I looked awesome. And THAT made me feel great!

Me, 9 days post-delivery dressed as Ahsoka Tano with Son #2 as Baby Stinky


Ahsoka Costume: I wore an orange, long sleeve, turtle-neck (fairly easy to find right before Halloween). Made the tube top and skirt out of some maroon fabric I found at the store and glued the top to the orange shirt. The head piece was just made flat, attaching white felt to some cardboard and painting the stripes of the head tails. A pair of white leggings, brown boots, and some face paint, and my 4 year old thought I looked like a brave Padawan from a galaxy far, far away.

May the Force be with you, as well as the creative juices!

-- Lori


Monday, October 14, 2013

It's Beginning to Look a Lot Like Halloween: Inexpensive Decorating

As a follow-up to my "spooky windows" post, I thought I'd share a few other Halloween decorating items I pulled together…fairly inexpensively…

Batty for Silhouettes


After doing the big window silhouette, I felt like the front door could use some of its own. We have 3 little window panes on either side of the door and I thought it would be a perfect place for a bunch of fluttering bats.

Once again I hit the internet looking for simple bat silhouettes. There are TONS out there to choose from (though you'll find MANY that are different versions of the Batman symbol).

After finding the bat shapes that I liked the best, I traced them using my Illustrator program and then printed them out on some scrap paper.


Bat silhouette templates

I used these as my templates and then took some black paper (that I happened to have around the house) and traced the template on the black sheets. I squeezed in as many as I could get on a sheet. Then I sat in front of the TV, watched one of my favorite shows, and trimmed them out.

Trimmed out bat silhouettes

From there all I did was tape them into the windows -- DONE!

The bat silhouettes attached to the inside of the windows.

 It looks really cool at night!

My front door at night when the inside lights make the windows glow.


A Scary Welcome


Over the summer I had happened upon a really cool black feathered wreath. I had NO idea what I'd do with it, but it was just really neat AND cheap—3 bucks! I couldn't pass it up. I knew I'd do something with it.

As it got closer to Halloween I had decided it would work perfectly for the season, but I needed to do something with it. I popped on Pinterest and searched "feathered wreaths" and "Halloween wreaths" to get a few ideas. Nothing really struck me, but it got the creativity wheels moving.

Once again, I happened to find myself at Target (I get a lot of inspiration there it seems…I like their style) and came across this cool looking felt skull cut-out. It had a bit of sparkle that I really liked too. I knew it would be the perfect size to fit into the center of my feathered wreath. And once again, it was cheap—$4

All it took was a little hot glue to put the two together. Because my door is brown, I needed some contrast behind the skull image so you could actually see it. I happened to have some sparkly white Fun Foam in the house (yes, I happen to have LOTS of stuff "around the house") and I attached that to the back to make the skull image pop. I have a very large ribbon collection (surprise, surprise), so I found some that looked nice with the feathers and added that as well. To "top" it off, I had picked up a little black crow at the Dollar Tree—yup, for just a buck!—and added him in as well. It added to the "spookiness".

And there you have it, a pretty cool, spooky, Halloween wreath for just $8!


Black feathered Halloween wreath with skull and crow.


You just never know where you'll find your inspiration for something. I always keep my eyes and mind open and wait for that flash of creativity to appear.

Hope some of these ideas sparked some ideas for you!

Friday, October 11, 2013

It's Beginning to Look a Lot Like Halloween: Window Silhouettes

When I was a kid, I ALWAYS remember decorating for Halloween. We lived on the second floor of a "big ol' spooky house" (my dad dubbed it "The Adams Family House), so of course we felt that we were obligated to deck it out for Halloween. We never really went too spooky….maybe we were too afraid of scaring ourselves...but my mom would by paper Halloween decorations and we'd make some of our own and we'd line the long windy stairway with them. I looked forward to doing it every year.

Unfortunately, as I got older, that was one holiday I sort of grew out of. I did still like putting out a pumpkin and hanging some fall leaves, but I never really went too crazy….But then I had KIDS!

Last year my youngest (who was 4 at the time) got REALLY into Halloween decorations. He kept requesting a "spooky house." We didn't have much in the way of decorations and I really didn't want to spend to much money on them, so I decided to see what I could do with what I had around the house.

We had just moved into our current house earlier in the year, so each holiday was a new adventure in decorating as we discovered what we could do with the new set up. One of the nicest features of the house was a BIG picture window. At our old apartment a neighbor of ours had put up some really cool "spooky" silhouettes in their windows. I loved the look and decided to give it a try on our big window.

Soooo off to Pinterest I went to research some ideas (FYI - I LOOOOVE Pinterest. One of the best inventions EVER!!! Has made my "creative life" so much more productive. I'll probably be referencing Pinterest quite often in this blog.

Part of my Holiday Board


I found all sorts of Halloween silhouettes and examples of what other people did.

I found myself really drawn to the images of "spooky trees". I thought that would really look great in the window, but of course, they can be pretty detailed. I wanted something "spooky" but also "cartoony". I happened to be at Target around that time and saw this cool store decor they had….

Target's 2012 Halloween Store Decor - What do they do with this stuff after the season is over anyway?


 ....and wished I could just take that tree. It would fit perfectly in my window. But I didn't think that would be possible…at least not BEFORE Halloween. So I just kept searching the web.

I eventually came across this image

It was PERFECT!!! Though maybe a tad to many owls, but I could just edit some out.


I brought the image into Illustrator, did a fairly quick outline to "vectorize" it and simplify it a bit.

My simplified version of the illustration I found

From there I could blow up the image to the size I needed. To print it out, I "tile printed" it on some black construction paper I happen to have around the house. Once all the pieces are printed out I taped them together like a big puzzle. Then came the really time consuming part: cutting it out.

I laid out the taped together sheets on the kitchen floor, slipped a large piece of cardboard under it and then got down on my hands and knees and cut the whole thing out with an X-Acto knife. I really don't know how long it took me. It's something I do in the weeeeee hours of the morning (I'm a late-night creator), but I find it easier to cut things out like this with an X-Acto rather than just scissors.

Once it was all cut out, I just taped the whole silhouette to the window. It's easier to do with a helper, as there lots of parts flip-flopping around. I just used a clear scotch tape. From far away (cars and people who pass by along the street) you can't see the tape.

When it was all done, it was EXACTLY as I had hoped! AND my 4-year old was happy with the "spooky" result.

My finished window graphics

So that is how I did it!

=============================================================

A few months after Halloween I came across this blog via Pinterest: Heartland Paper


This post shows you how to do it with black vinyl and even has templates to download. Definitely a great resource.

Tuesday, October 8, 2013

Lime Green Makes Me Happy

So my opening post was about my love of creativity and how I love to create things. I find creativity in just about everything. And I can CREATE with just about everything. However, there is ONE medium that eludes me -- The Web!

I have just never gotten into web designing. I don't really know what it is about web design that stifles my creativity, but I have pretty much no interest in it and when I contemplate doing it, my creativity tank totally empties. Maybe someday I'll be able to break down that wall and it will open up a whole new world for me, but at the moment, it's just not my thing.

With that being said, I've decided to start a creativity blog. I choose BlogSpot/Blogger, as I had played with it before and it was recommended by a friend. Lucky for me, it has some great templates to choose from.

My day job is as a graphic designer, and it hurts my "designer ego" a bit to default to someone else's "template." But I've chosen to view it as just a "canvas" where I can showcase my creativity and not as a representation of my "creativity".

As I went through all of the supplied templates, I did contemplate the options that had pretty curly-Qs, fun doodles, or just a space scene (I love space), but I settled on this simple Lime Green template…because Lime Green makes me happy…and when one is happy, their creativity flows much more freely.

"Lime Green Makes Me Happy" became sort of a motto of mine some years back. I think it may have actually started when I moved into my first apartment and I discovered that the peach kitchen it came with did NOT make me happy. My landlord said I was free to paint it whatever color I wanted to, so I went to the paint store, looked at all the colors, brought some sample chips home and discovered that the lime green just made me smile. My husband thought I was crazy, but he knows that I'm the "creative one" in the family and if it was going to make ME happy, it made US happy (smart, smart man). So the lime green went up on the walls and it was a huge success!!! Everyone who came into our house LOVED the Lime Green kitchen. It made me happy. It made me feel cozy. It made me feel creative…as the kitchen tended to be the place where I did most of my projects.

Several years later we moved to another apartment and this time the kitchen walls weren't painted yet, as the landlord had just finished remodeling the kitchen. I again asked if I could paint it lime green, and he said it was fine as long as it wasn't to dark. So I got my Happy Lime Green kitchen once again.

Me, in my Happy Lime Green Kitchen #2. Notice I'm also WEARING Lime Green


Another view of Lime Green Kitchen #2

Counter space in my Happy Lime Green Kitchen #2


During this time, my office at work was being renovated, and being that we were an "art department" we decided to paint the walls with color rather than the white walls we had had for so many years. Everyone in my design group new of my "motto" and they had started to adopt it as well. I would say, how can you be Unhappy when you look at that color? So we decided as a group to pain the walls Lime Green and we've never regretted the decision. The office has been that color for almost 10 years now and we still get comments on it.


My work space at Work

Happy Coworker in our Happy Lime Green Office
Our Lime Green Office SPARKS creativity!


About 2 years ago, I and my family moved once again. We had no real plans to move, but one late fall evening I happened to see a friend post pictures of an apartment she was renting and low-and-behold, it had a lime green dining room!!!! I was SOLD! Once we moved in, the dining room also became my craft room, so it's my creative center :)
My crafting corner in my Lime Green Dining Room. I found this cabinet on Craig's List and repainted it and added the curtains in the window to hide all my crafting supplied inside. It works perfectly in the room!


So it only makes sense that my blog dedicated to all the creative stuff I do and think about would be Lime Green. It really DOES make me happy when I see it. I hope it does the same for you.

Thursday, October 3, 2013

Creatively ME!

Welcome to my blog Creatively Lori!

I'm dedicating this blog to all the "creative" stuff I do as well as the "creative" stuff I think about and see around me. It's not just a "craft blog" and it's not just a "mommy blog", but a place where I can share some of the ideas that I have floating around in my head and a place to share some things that inspire my creativity.

 As it states at the top of this page, "I'm Creative." If I had to think of one word that describes me, "creative" would be it. It's just what I am. It's who I am. I love to create!

The definition of "creative" is:


cre·a·tive (kr-tv) adj.
1. Having the ability or power to create: Human beings are creative animals.
2. Productive; creating.
3. Characterized by originality and expressiveness; imaginative: creative writing. n. One who displays productive originality: the creatives in the advertising department.


I love that first part "Having the ability or power to create". I do believe that is my Super Power. For a long time I totally took it for granted. I thought everyone was like me, but as I got older and met more people, I realized not everyone WAS like me. Not everyone's brains worked like mine.

Let me state up front -- I'm FAR from the most creative person on the planet. There are many people out there who are WAY more creative than me. I'm by no means Martha Stewart or George Lucas...but they are definitely two people I look up to. But what I have learned over the years is that "creatively minded people" are different than "non-creatively minded people." We see things differently. We think differently. People will say to us "Wow! How do you think up these things?" We think "how did we not?"

 I love to create and I love to share my creations. So that is what you can expect to see here at this blog if you choose to spend some time here. I hope you enjoy what I have to share. And I hope you will find some inspiration in it, just as I find inspiration from so many of the other creative people I cross paths with in my life.

-- Lori